Monday, February 29, 2016

Favorite Blankey Fix-up!

Mr. A & Mr. C both have a favorite blankie that is a must for comfort!  Got a cold, where's the blanket?  Bumped your head, find your blanket!  Tired?  Find that blanket!  When Mr. C was just starting to talk he would reach for his blanket and say "me? me?" as a result his blanket is now  named 'Meme.'

So these blankets are obviously very important to our well being, and as a result, 3 1/2 years has taken a bit of a toll on Mr. A's Blanket!

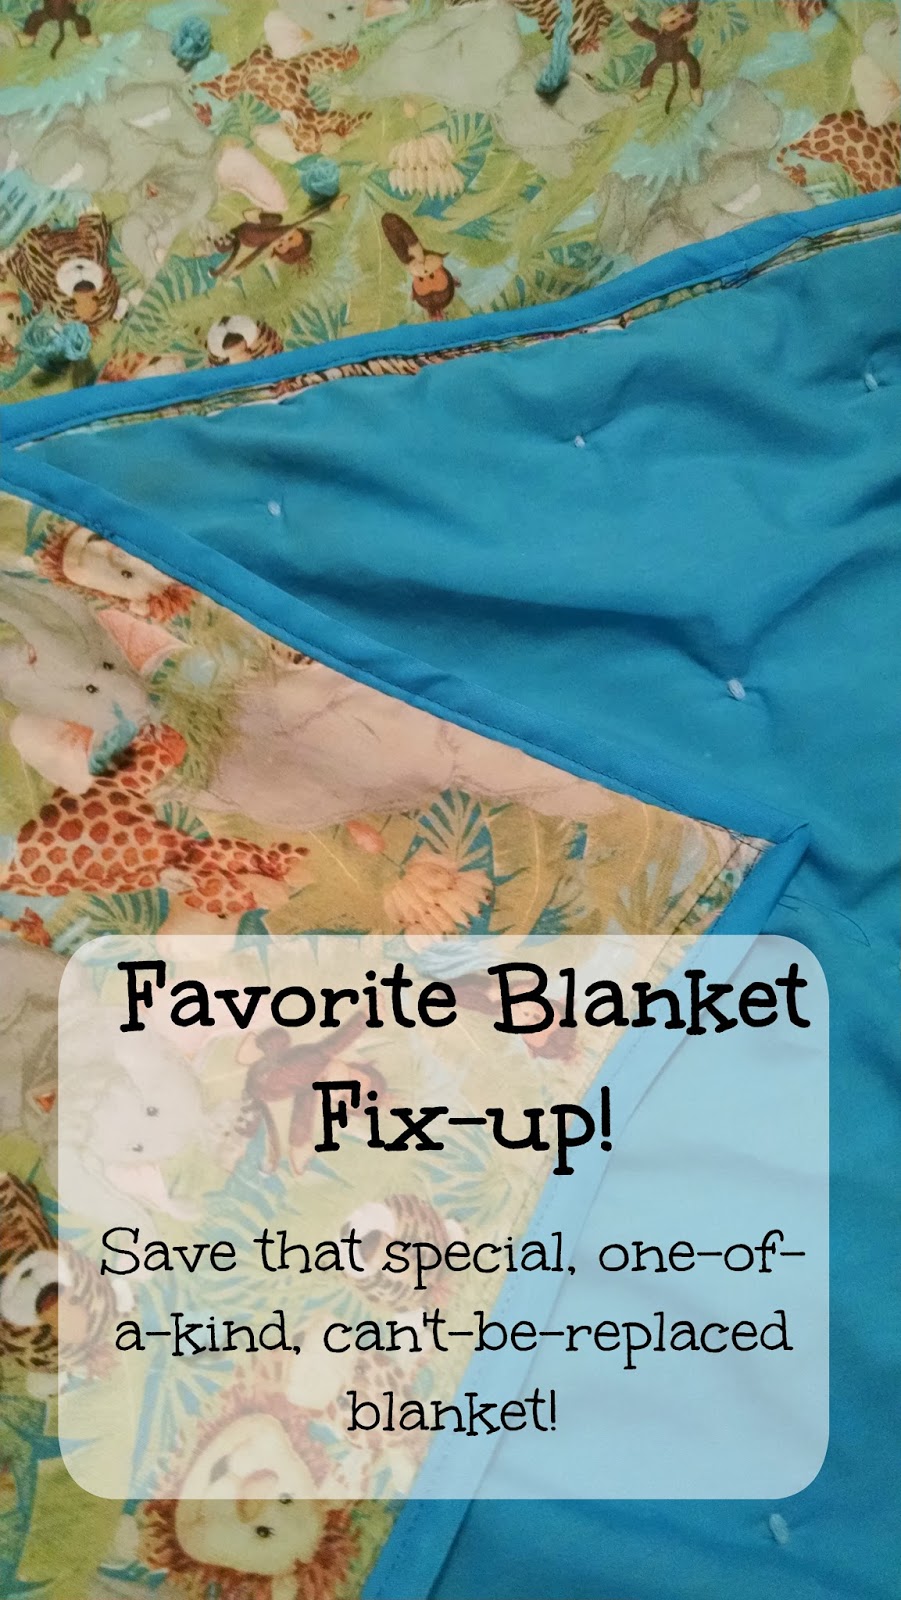
These blankets were made for them by my Mom when they were born, which makes them extra-extra special!


But the edges are starting wear out...


I was getting to the point that every time I had to wash his blanket I was worried if it was going to fall apart more... :(  

So it was time to find a solution!  Even Mr. A was starting to notice the holes and was becoming worried about his favorite comfort!


I started with two packages of the 1/2 inch wide bias tape in almost the exact same color as the back of the blanket.  Depending on the look you like, it might be worth getting the wider stuff, I think it's like 5/8 or something, In the long run I like the 1/2 inch look, but it doesn't cover the whole binding from before, however, if you want it to cover the old, just get the wider stuff :)


Pretty much just sew it like any binding (which, to be totally honest, I am no good at!  If you want a good binding tutorial, this is not the place.  Sorry!) Open it up and sew it down one side.


Then flip it over and sew it down the other side


Voila!  No more ragged edges that threaten to fall apart completely!  As you can see from the last two pictures, the old binding (the kind you fold over rather than bias tape) shows through my fix, but I kind of like it!  To me it allows the love of both my mom and me,  Grandma and Mommy, to show on the blanket.

Mr. A was sooo excited to see the fix!  He kept telling everyone, 'my Mommy fixed my blanket,' 'My blanket's not broke anymore, my Mommy fixed it.'  He is such a cutie!

Good luck!  I would love to see your little ones' favorite blanket or other comfort item!

Thursday, February 25, 2016

Dinosaur Costume!

It only took me ... 4 months, but I finally finished my tutorial on our Halloween Dinosaur costumes!

So the idea for our Halloween costume this year started with the amazing dino tails from Running with Scissors  you should really check out her tutorial for a great tutorial!  I will explain a little, but she is much more detailed than me!

Side note: The Kelly Sisters at Running with Scissors has requested that no one use her dinosaur tutorial/tails for personal gain on any level.  Please continue to respect that wish!  Please do not use her tutorial, or this tutorial to make tails for profit, even on a home-based scale.  That being said, make them for yourself, for friends, give them as gifts, share the love!  Thanks!


A family of Dino tails!


So first thing, I made the tail spikes from felt (by the yard) you only need about 4 inches of felt for this part!


Pin it and sew the spiky side


hmmm, guess I lost the pictures of the next part, cut your two triangles and pin in the spikes down one end and sew up the two long sides.  (I prefer to leave my hole for turning it inside out on the non-spike-straight side)

Next, make the straps to hold the tail around your waist.  Cut four strips, 3-4 in wide and as long as you need for the person wearing the tail.  I measured my kiddos waists, then added an inch or two for overlap.  Because of the additional width of the tail it gives you sufficient strap.  Make two straps that will total your chosen size.  

Sew up the two long sides and one short side and turn them inside-out


Once you have it right-side-out sew several inches of velcro on the straps.  (a long strip (mine are 6 inches or so) allows for growth and different kids to fit the tails)

Then pin the circle for the end of the tail and the straps inside and sew around being careful to not catch fabric you don't want.  (take into consideration which direction the velcro is facing - OR - wait to sew it on until after you sew the circle!) Then use the hole you left in the tail to turn it all inside out.


Stuff and sew the hole closed!


Now the Shirt!


Can you believe that's the best picture of the shirts I could find!


First, draft a hood.  If you have a hood pattern, go for it!  if not, just trace a hood that you already have! sew it up and I turned under the front edge and used my double needle to make it look good and professional


Pin the hood on and sew it on.  I sewed right in the 'ditch' between the shirt and the neckband to hid the stitch and make it look like I bought it that way.


Overlap the front of the hood, centering it on the center front of the shirt.


Cut out however many spikes you need to go up the back of the shirt and over the hood (this was a 12mo size shirt)  The spike is a diamond, designed such that if you fold it in half it becomes a triangle.


Pin the spikes on the shirt


Stitch up the middle of each spike (leave them all connected until you get the last one stitched.  don't cut the thread between each spike, it will take f.o.r.e.v.e.r.)


Then go back and stitch each spike together.


Finally, I personalized the shirts.  I used a 2 1/2 inch piece of 3/4 inch quilt binding and zig-zag-stitched it to the inside seam (I also put the size on the back seeing as I cut out all the original tags.)


Hope you enjoy!  I want to see what you make!  What kind of variations have you come up with?


Oh, and for those of you who are thinking, 'my kid is super messy, can I wash this?'  The answer is YES!  I have washed ours several times, I would suggest washing them inside-out for the sake of the felt spikes, but they are still holding strong!


Monday, February 22, 2016

Easy Mongolian Grilling!

There's a great Mongolian-grill-style restaurant around here but it's kind of expensive for our tastes!  So I made some right at home!  It was so good I didn't even get a chance to take a pic of the final product! (lesson (maybe) learned! Take pictures before calling the boys to dinner!)

Super easy, great date night activity!

First:
Cook up your protein!  Today it was a can of chicken (cooked) so it was really just a couple minutes to warm it up and season it a bit.

Second:
Veggies!  Today I used a frozen bag of 'stir fry veggies.'  Tasty!  They are about $1 at Frys and just the right portion for our family!

Third:
Ramen Noodles!  Or whatever noodles you choose.  Just be sure to undercook them a bit as they cook when you put it all together and can turn nasty and mushy.


Bonus Points:  If you have a wok toss it in and cook it all together

If Not
Hey!  We can be wok-less buddies!  I used my electric griddle for this, but more sides would be better.  Sometimes I'll use two frying pans to do this in an attempt to make a smaller mess, but honestly it just makes a mess!

Once you mix it all together, add soy sauce, Worcestershire sauce, and one egg (beaten and watered down) or whatever sauce you like!

once the egg is cooked, serve and Enjoy!

What is your favorite combination?  Comment below!

Thursday, February 18, 2016

Grandma's Washstand - Part 4

So last spring when I first got this washstand I worked on it for a bit before it just got too dang hot!  Our garage stays a solid 95 degrees all summer, and that's just too much!  

For Christmas we got a sander and I decided it was time to get some sandpaper and get to work!!!


Do you see that!!!  That was some old, stained wood, lots of old paint and stain and years of water (water damage and some mold too I think).  Then you have the after, BEAUTIFUL oak wood underneath!  I am sooooo close to finishing this!  I need to finish sanding the front (I got started, but there are lots of nooks and crannies) and the drawer and doors then it will be ready to fix the doors and paint!

Now I just need to figure out how I want to paint it!  Right now I'm thinking of a brown stain with some golden tones, but I'm still not sure... Let me know what you think would look good!

And just in case you missed the other posts about the Washstand, check them out here:

Grandma's Washstand Part 1
Grandma's Washstand Part 2
Grandma's Washstand Part 3

Monday, February 15, 2016

Love potions! - Singing-time Science!

So I got this really great idea from a friend, and then I saw it again a couple other places and thought, YES!  I want to do that!  So I give you one of the funnest singing-time activities you will do this year!  

So when I tested the idea I did it one way.  When I actually did this, I did it a bit different, but the concepts are the same!


The basis for this project is the classic, baking soda and vinegar reaction.

So for the practice round I put a about a half cup of vinegar in each of my containers and a drop of food coloring in each spoon (one spoon for each container)


Then I covered the food coloring with baking soda, thereby hiding the color!


Then I let Mr. A and Mr. C stir the vinegar, thereby creating some beautiful, colorful, foam!


They had a blast with it!  they had enough fun that I decided it would be great for primary!


Now for the changes I made for primary.  

First, I used jars with lids so I could bring them home easily and not worry about making a mess.
Second, I made some awesome labels to play off of it being Valentines Day when I did it.  (those labels are below, feel free to use them!)
Third, instead of putting the food coloring in the spoons, I put it on the bottom of the jar and had the kids pour the vinegar over the soda instead.  It worked even better!!!  The moment the vinegar hits the soda it foamed way up and the kids LOVED it!
Finally, I put the jars on a cookie sheet with a towel to soak up any spills... which, every-single jar overflowed, so it was a really good idea!


Now one thing I learned in Primary.... figure out any color mixing ahead of time.  My 'purple' first turned out grey, then brown (I added more red)  yeah... oh, and it turned my towel maroon (which, shockingly enough, I got all that color you see out!)

Enjoy!  This is super-duper fun!

Love Potion Labels
these are mine, don't sell them please, but use them, love them, and share them!


Blank Labels
Labels you can make your own :)


Thursday, February 11, 2016

Yummy & Easy Stuffed Chicken!

What?!  Did I say EASY and Stuffed Chicken in the same sentence?? Why yes I did!!

With Valentines Day coming up, this is the perfect way to impress that someone special in your life!

Here's what you'll need:

Frozen spinach (chop it down so you don't get big chunks, that's not pleasant)
Ham (lunch meat)
Cheese (I used cheese sticks because that was the white cheese I had)
Salt/Pepper
Cream Cheese
Chicken Breast (I've used thighs and breasts, there's just not enough meat on a thigh to hold the yumminess in (though I do like thigh meat better!))
Bread crumbs
Parmesan Cheese (Sprinkled Cheese, at least that's what I always called it growing up and still do today!  It confuses most people who hear me say it....)

Quick side note.  BUY a PEPPER GRINDER.  Seriously though, fresh cracked pepper is DELICIOUS!  Give it an honest try and you'll never go back! (you can get them cheap at Walmart or Target)


Mix everything together through Cream Cheese


Now fillet the chicken, but don't cut all the way through, just make a nice pocket for the goodness!  Then scoop it in, and really stuff it in good!  If you need, use a toothpick to hold it all together (just count toothpicks so you get them all out when it's done cooking!)  Lay the chicken in a greased cooking sheet (bonus points on clean-up if you line it with foil) and sprinkle the breadcrumbs and parmesan cheese on top.  Bake at 400 degrees until done, around 20 minutes


Enjoy!  Seriously, soooo yummy!
The goodness inside becomes a delicious sauce and keeps the chicken moist!  Enjoy!


Monday, February 8, 2016

Pirate Day!

 AAARGHH Me Mateys!  'Tis Pirate Day aboard our Ship!  Me Mateys really love Pirate Day, so we's a goin' to share it with a you!


Whew!  It's hard work to talk like a pirate sometimes!

We have done pirate night twice now and my boys LOVE it!  This time was at the request of Mr. A specifically :D

This time I kept things a titch simpler than last time, but I'll fill you in on all the details!

First I made pirate hooks!  I had pictures, but who knows what happened to them... so check out this tutorial from East Coast Mommy on a really easy way to make awesome hooks that my boys LOVE to play with!

Next!  Telescopes!  Again, I had pictures, they are gone :(  But!  These are also super simple!  All I did was paint toilet paper tubes black and then glued strips of foil to make them look like telescopes.  You can check out similar telescopes here, at The Imagination Tree to see what I mean.

Next, Treasure Maps!  These maps didn't actually lead anywhere for our activities, but they could!  We just used some scrap paper, crumpled and tore it a bit (no pirate map is smooth and perfect, right?!)  and drew a map!

Last step, I pulled out some bandannas and eye patches (The Party Store, 40c each!) and a little mascara for a scruffy beard!

Now for Dinner!


We've got,
 Green-Bean Seaweed!

Golden-Cookie Dabloons

Lady Fingers
 (leftover pie crust with butter and cinnamon-sugar)


Steak-n-Cheese Pirate Hats!
(circle of pie-crust, strips of steak, onions, and green peppers, mixed in with cream cheese and mozzarella cheese! mix everything together, then put a scoop of the mixture in the middle of a circle of pie-crust then pinch to make a three corner hat.  Cook until crust is done.  Yum!)

Silver-Cheese Dabloons
(slices of string cheese)

And Finally,
Octopus Grog!
(Lemonade with purred raspberries, strawberries, and blackberries!)

Yum!!  Honestly you could do anything your family would like!  Last time we had octopus leg-spaghetti and cannon balls (meat balls).  Get creative!

We finished off this pirate night with a round of Jake and the Neverland Pirates, but last time we watched Hook with the boys and then me and my husband watched Pirates of the Caribbean after the kids went to bed!

Yo-Ho! Let me know how your pirate nights goes!