Saturday, September 22, 2018

Newspaper Rolls - Best Ever Mom Hack

My all-time favorite mom-hack came from my mom!  She has some of the best ideas, and is really the reason I am, who I am, today!  This post is most of a post from several years ago from my personal blog before I decided to share my ideas more widely.  I hope you enjoy, the things I wrote are as true today as they ever were!

"We also got a newspaper end today.  Pretty much the coolest idea ever, and one that I learned from my Mom!  Basically you call your local news PAPER (they do need to print a paper for this to work) and ask them if they have any roll-ends.  The idea is that they don't want to run out of paper mid-print, so they will take a roll of paper off when there is still a good 2 inches thick of paper on the roll!  (which will give you months if not years of paper!)  So for $2 you have all the paper you could want!  My mom got a roll when we were younger and we loved it!  It was paper that we didn't get in trouble if we used it, or used a lot of it!  We made posters out of it (welcome home!  Baby boy!  etc.) We traced each other and colored ourselves in, I think it even got used as table cloths that could be colored and personalized wrapping paper a few times :)  Well now our kids get to be the recipient of my Mom's brilliant idea!


It is amazing how much one woman can change the lives of those she loves and nurtures!  I recently read a quote along the lines of, it just takes one woman to change a generation.  I think this is true in either direction, for the better or for the worse.  

My mom did an amazing job raising us and teaching us the right way to go!  The little things really do make a difference!  Driving us to and from school every day so we didn't have to take the bus.  Being home whenever we needed her, to pick us up when we felt sick, or bring our lunch, or homework, or glasses (yes, glasses.... I did forget them frequently at first....yeah, I know....) or gym clothes when we forgot.  

Yummy home cooked meals and even those veggies ;)  And don't forget all those long hours she spent poking and prodding us to weed the garden, or mow the lawn, or practice piano so we could be the best people we could.  Look at me now!  I am looking forward to the yard work to be done here!  I actually missed it when we lived in apartments! (I know mom & dad, I know... but I really have missed it!)  

And don't forget the hours spent getting us ready for church and going, even when it would have been easier to stay home than to wrangle kids for 3 hours in a skirt!  Or the thousands of FHE lessons that she taught and sometimes had to push through, to make sure we knew the gospel that she loved so much.

And most importantly, how much she always loved us!  And no matter how many times we foolishly yelled, "you don't love me!" when we were teenagers, she always loved us.  Thanks mom!  Love you!  I am better because of you!  I am a better mom because of your example! <3"

Like I said, still all true!  My mom gave up a lot for me and my siblings, but she gave a lot too, and it shows in all of us!  My youngest brother recently left home to serve a church mission, a testament to the kind of woman she is!

And don't forge the paper-roll idea!  Seriously, BEST. IDEA. EVER!!!  I literally use the paper daily!  I will use it as a drop-cloth for projects, put it on the table when the kids want to paint, we've traced the kids, sent large birthday banners to far-away family, giant airplanes, birthday invitations, tree trunks, pin-the-bat-on Batman, wrapping paper, Pin-the-tail-on the Fish, really, the possibilities are endless!  When the kids want to draw another picture I send them to the roll and they will cut themselves (and their sister... unless they want to share) a piece off.  I don't feel guilty about it, they aren't using printer paper, and I feel no shame tossing it in the recycle bin when we're done!  Give it a go!  I promise you won't be disappointed, and so cheap too!  Til next time!

Tuesday, September 18, 2018

Batman Birthday!

 Mr. C went through a batman phase - he's never seen batman (other than the lego-batman movie) But he loves batman!  So for his birthday... once time (A while back... I've been busy, what can I say, found some great old pics!)  We had a batman party!


What's a birthday without cake??  We tend to do cupcakes at our house because of the ease of individual servings!  No trying to store half a cake that will never get eaten.  When we get tired of cake we can freeze the rest!  I used a Duncan Hines cake mix - Dairy Free!!! - and my favorite no-melt buttercream frosting!


The bats are a dairy free chocolate chip that I made using this technique I used back when we had a Robin Hood Party!


My kids love a good pinata, and I refuse to pay so much for something I can make!  Since he was still younger for this part we made it a pull pinata, much like we've done before, such as here.  Really super easy to make!  Follow the link for a tutorial!  


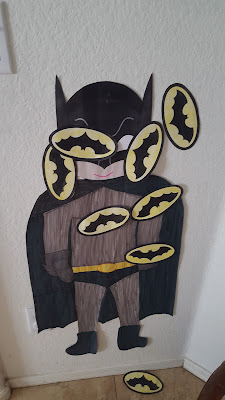
Then pin the bat on batman!  I found a good bat-logo online and printed several, then using my newspaper end-butcher paper, I drew and colored a logo-less batman, about 3ft tall!  The kids loved it!


Finally my husband was a trooper and cut out probably thirty, three inch bats from construction paper to tape to the yellow and black streamers that we hung all over our house!  A Batman party dream!  


Happy Birthday!!!

Thursday, September 13, 2018

Fall Stack-able Pumpkins - Halloween Stack-able Pumpkins

How's that for a long title??  But there's really no other way to describe it!  These sweet pumpkins are fall from one way and Halloween from another! 


Aren't they so cute??  I love fall decorations that can be turned one way for September/November, then in October can be converted to Halloween!  Makes decorating during a busy time of the year so much faster!  And they're so easy too!

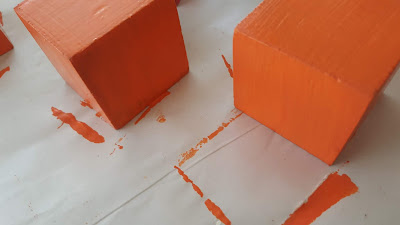
I started with three wood blocks!  Theses used to be blocks from my kids toys, but I've never liked the colors these particular blocks were and frankly they didn't play with them often so it was more than time to re-purpose them!


Now painting these was no walk in the park!  I sanded the old paint a little bit to help this paint stick better, but the paint was thick and I didn't go all the way to wood.  At first I thought I was going to need 10 or 15 coats to cover it!  Then I remembered a trick...

White Paint!

That's right, add just a tiny bit of white paint to your orange pain (or other light color, like yellow!) and suddenly your paint is more opaque.  I painted 5 sides first, then when they were all dry the one side that was left.  The one side took 3 coats, the other sides took 3 coats of no-white, orange paint and 3 coats with the white *face palm.*  Lesson learned!

Have you ever seen the pencil-rubbing trick for transferring designs?   I had my doubts, but it works so well!

Basically you print off the words or image you want on just regular paper, then you take a soft pencil (like the standard #2 pencil from school) and scribble all over the back of the image. 


Just to clarify, you scribble on the back of the printed design!

Now center the paper on your block and trace the online on the top of the printed design.  The pencil on the back will transfer to the block, you don't even have to push hard!


I know what you're thinking, where did the pink blocks come from??  I did two projects that day but only took pictures of this technique once... oops!

Then, using a fine tip brush, fill in the letters, I chose white.  I used a basic Arial Black font and did my best to get 1.5inch letters.


Now when you are looking at the letters you want to put your jack-o-lantern faces on the side either directly left or right of the letters, I chose left.

I just drew it free-hand in pencil first, then filled it in with black paint!  You could also use yellow paint and I think glitter would be a nice touch, but I only had orange... oh well.

On the top of the "B" block I drilled a hole and hot-glued a stick from my yard in the top.


For a final touch I hot-glued a jute/twine bow to the base of the stem.  don't put a stem on all of the pumpkins if you want to stack them! 

However, they would look really cute side-by-side as well, in which case they would all want stems.


I also took some sandpaper to the edges to rough them up and give that worn look.  Ironically it really finished them!  They were too one-dimension before that.

For the just-fall look, simple turn the pumpkins around so the letters/faces face a wall or generally out of sight.  I also realized today that for the bottom two pumpkins you can put one of the Halloween-specific sides face-down so you only have to hide one side of them.


Enjoy!!!  I'd love to see your take on these adorable pumpkins!

Wednesday, September 5, 2018

Fabulous Buttercream - That won't melt!

If you read this blog very often you know that we live in Arizona right now, and it is HOT here from April to October, like 100+ nearly every day!

My first experience with frosting on a cake here came a couple weeks after we moved here.


Look closely and you can see that the hair on Cookie Monster is quickly becoming smooth, especially on the lower-right side, and at the base of the cake you can see the melting frosting pooling...


I made matching cupcakes for this same birthday to take to my in-laws for Sunday dinner and by the time we got there the frosting completely melted off, the eyes were sliding off and the cookies were soggy.  FAIL!!!

I had a couple more experiences like this before I saw the light!

I went to a birthday party for my friend's little boy, in August, Outside, at 118 degrees, and her frosting DIDN'T MELT!!!

Naturally I asked for her recipe and it is glorious!  I've left this frosting in the car, in July, for 3 days, and it still didn't melt (mind you at that point I didn't eat it anyway because I'm pretty sure something had gone bad by then, but you get my point!)

Now here is where I guess I should make a confession... before my frustrations with frosting in AZ, I had never (successfully) made my own frosting.  I always just bought a can of whatever flavor fit my needs and that was that!  Turns out, most buttercream frostings have nearly the same ingredients and proportions.  Where you live, the temperature and humidity mostly, make the biggest difference, that and dietary needs.  So here is what I do now for all my frosting needs!


So here it is, No-Melt Frosting!

Ingredients:
   1 Cup Shortening or Butter
   3 Cups Powdered Sugar
   1 tsp Vanilla or other flavoring
   Milk of choice as needed

I should mention here that because of the milk allergies we have in our house, I use shortening for my frosting.  Both regular and butter flavored shortenings are dairy free!  Regular ol' unsalted butter works great too!  I do not recommend some of the dairy free butters, such as Blue Bonnet Light.  They tend to have lots of water in them which (in my experience) tend to separate when beaten and make for a sticky mess instead of fabulous frosting.

It is important to note that regular butter will melt faster than shortening.  If you're doing a cake for an outside party, consider using shortening!  Alrighty then, lets get going!

First beat the shortening in a mixer, like really fluff it up good!  If you're using butter (or butter flavored shortening) beat it for as much as five minutes to lighten the color.  It will help your frosting be more white in the end.


Add all the sugar at once and stir slowly so it doesn't poof everywhere!

At first it will look like there is no way it will all stir in, like this.


Keep going!  It will come together!

While it's mixing let me mention something.  Pro-tip!  Do not add the vanilla or milk until the sugar is completely combined!  I know it seems like it will save you time, but from experience, it will bind with the sugar and you will end up with vanilla sugar lumps that will not go away!  Please wait!  I promise, it won't save you time!


See, starting to come together!!


And there we have it!  Now that it looks like frosting, turn it on really high and give it a good beating!

Then add your vanilla and whip it up again.  Add milk a teaspoon at a time until it thins to the consistency you want it.  Then add food coloring as needed for your needs!

Here are some of my creations with this fabulous frosting!

Fish cupcakes for a fishing birthday!
(fondant recipe to come)

I used my Russian tips to get these beautiful flowers!
Cookie cake recipe to come!

I used  Wilton 1M tip for these cupcakes, a 2D also works really well!  They're big though, so you'll need a designated piping bag with a bigger hole at the end, but you'll get beautiful cupcakes so easy!

More Russian flower tips.

And again...

And again!

The Yoda is made out of marzipan, but the frosting is this recipe!

to avoid having quite so many bags of frosting, the light sabers I frosted from a zipper baggie with a tiny corner cut off!

So versatile and super delicious!  You could totally use almond flavoring, orange, lemon, strawberry, watermelon, rootbeer, anything really! (keep in mind some, like rootbeer, would tint the frosting somewhat)  Enjoy!!!


(To print the recipe, right-click on the picture and select "save image as" and save to your computer.  It is designed as a 4x6in print.  Enjoy!)