I was cleaning off the top of the fridge the other day and came across a box of OLD Cherrios... I mean like, I-think-I-opened-the-box-before-we-moved-to-Arizona-OLD!
But rather than throw them away I decided to use them for two other - no-eating - things. The first,
Bird Feeders!
This is seriously one of the simplest ideas ever! First, string some cherrios on a piece of wire and wrap the end around.
Then string on a bunch of cherrios.
Then, wrap the end around the beginning and bed into a shape!
Finally, hang them somewhere outside for the birds to enjoy! Seriously, it is that easy!
You could even use pipe-cleaners, but I didn't have any of those handy.
This is some serious-yummy!!! and sooooooo simple!
Simply line up some chicken, chunks of potato, and frozen green beans. Then I sprinkled diced onion and minced garlic across all of it. Some salt, pepper, and paprika across everything. Finally, a drizzle of olive oil!
Then Bake it until the Chicken is done at 400F (20-ish minutes, depends on how defrosted the chicken is!
When it is just a few minutes from done sprinkle cheese across the potatoes and put it back inuntil the cheese is melted.
Serve and enjoy! We liked this so much there were no leftovers for my husband's lunch the next day! Enjoy!
I recently was called to lead the music in Primary in our LDS ward. Now if you're not familiar with this calling, it essentially means I am in charge of leading the music during opening exercises and then lead a 20 minute music set in which I teach the children (ages 3-11, which is somewhat unusual, often it is broken into Jr & Sr primaries at 3-7(turning 8) & 8-11) the primary songs, specifically songs for the yearly primary program in the fall!
This year has a beautiful line-up of songs, starting with a new song, If I Listen with My Heart.
It is a beautiful song!
We've already learned verses 1 & 2 so this week we needed something new to learn verse 3. So after some brainstorming with my husband he reminded me of this great idea to have a dart-less balloon game! It was the perfect idea!
No sharp things, but great incentive to sing! Most kids love the idea of popping a balloon!
First, one foam-core board from the dollar store, the words printed out big, 12 balloons, 12 tacks, and the numbers 1-12 printed out big.
Next I rolled up the numbers and stuffed one in each balloon.
Then I measured out the board and drew lines that intersect 12 times.
The rest of this I waited until the night before so I didn't have sharp things hanging out at the house all week and balloons taking up way too much space!
Saturday night I poked the tacks through the board at each intersection and used masking tape to tape them down so they didn't fall out
Front of the board
I also inflated all the balloons.
Right before I did the activity (at church, between Sacrament meeting and singing time) I taped the balloons to the board.
They are taped so the tack does not touch the balloon, but is really close! The idea is that when the child throws a beanbag it will push the balloon against the tack and pop the balloon!
Then when we were ready to go I put the word strips with the third verse on the board and we sang it through a couple of times, talking about the words and such. Then I let one of the sunbeams (ok, so it was Mr. A, I may have bribed him that he could pop one if he would go potty....) toss a beanbag, and on the second try it popped! The kids thought it was the coolest! Then we took the number that fell out and took down the corresponding word strip (12 balloons = 12 word strips)
Then we sang the song again (without the chorus) with the missing word strip. If they sang it well (got most of the words, sang loud and 'pretty') we did it again! Sometimes we had two people pop balloons to speed things up a bit.
We didn't get through all 12 balloons in primary, but Mr. A & Mr. C had fun finishing them off when we got home!!!
There are soooo many possibilities with this activity! This could become your traditional Balloon Pop game, you could put candy in the balloons and it becomes a modified piñata, or you could use it to learn colors, for motor skills, the possibilities are endless! Enjoy!
I love to share ideas! Just one request! If you want to put this idea on your blog too, please link back here to my blog, share the love!!
When Christmas is over and all the Christmas decorations come down, the house just seems.... drab... As if winter is hard enough sometimes, all the festivities are over, and the world becomes visually dull. Especially if you live somewhere with snow and ice! January/February can be that nasty month where it is just nasty cold and yet it doesn't snow so everything turns a nasty grayish-brownish color as the snow half-melts and mixes with the mud on the road and everyone has the same car color, salty-gray.
Now, in Arizona January has been beautiful so far! Mostly clear skies and temperatures in the upper 60s-70 degrees!
Just the same, January is winter and deserves it's own set of decorations! Right now mine are really simple, I don't even have anything for our front door (I don't remember if I used anything last year, but I'm pretty sure the year before my star-wreath for Christmas stayed up until Valentines day....) But I still like to celebrate the frosty blues and whites of winter!
This cube-vase sits in the center of my mantle between the pictures of my husband and I and our boys. I actually switch out the contents for most seasons to keep things simple. All I have here are some small blue flowers from my 'stash' (aka. former projects that I had leftovers from) and some pinecones the boys and I gathered from my in-laws' yard. Now the pine cones I actually painted with a way-thinned down white paint, then brushed with glue and dipped in epson salts to give them a frosty-morning-frost, kind of look. I thinned my glue as well, but I don't suggest it, my salt is falling of.
I also have this large vase full of pinecones (not painted) and a silver bow, sitting on my piano.
The only other thing I have is an 8x10 black picture frame with this free printable in it:
Only difference is I only have a B&W printer so I used my trusty markers to add some blue and yellow to it (traced the letters mostly and filled in a few)
I desperately want more, but just haven't found the time, motivation, or frankly, inspiration.
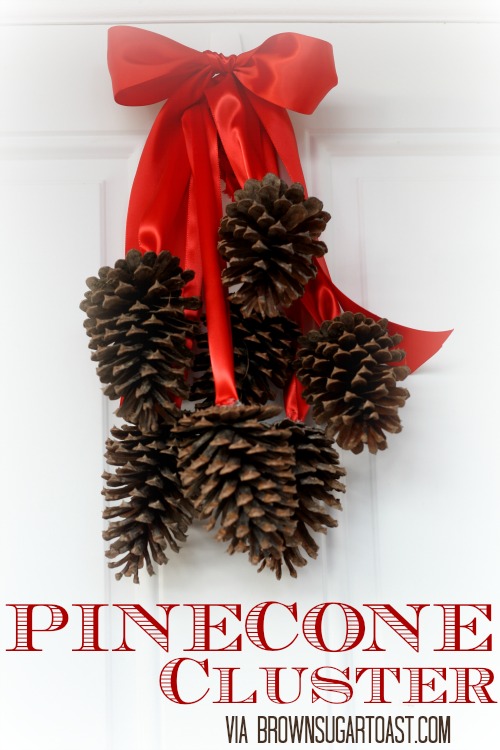
I am thinking maybe this Pinecone-cluster for the front door, with a blue or silver ribbon. Maybe burlap/jute.
And I really want something to hang across the fireplace, maybe something like this:
in "Let it Snow"
I'm just worn out from the holidays and now potty training - I don't have the motivation to do anything too big!
Let me know what your favorite fast, easy, and cheap winter decorations are! Any ideas to finish sprucing up my home for the month? Comment below!
We're working on round 3 of potty training right now - that's right round 3... This time we are going 100% undies only! (well, pull-ups at night, I'm just not ready for that step!) This means even when we leave the house, which is scary!
Now I'm not much of a fan of disassembling my sons car seat, even though Mr. A's is way easier than Mr. C's, and I really don't want to do so every time Mr. A has an accident in the car. So, I did some looking into 'piddle pads' and decided it was a great idea that I didn't want to pay for ;) So I looked some more and came across these two designs,
I downloaded the pattern from the first link and added some width and length to the bottom of the pattern.
Then I cut it out from a table cloth from an old project, an old towel, and two from some cotton flannel.
I layered them, bottom to top, towel, table cloth (right side up), Flannel (RSU) and Flannel (RSDown)
I sewed around, leaving an opening, turned it right-side-out, then top stitched all the way around
The next step is where the second link came in.
I made a arch shape and sewed the same layers as before (minus the towel) and followed the same steps.
I then sewed a looooong button hole and attached the arch from the back to make a protecting flap for the middle buckle
All done! It fits nicely and is easy to remove. I made two (and hope to make one or two more) so that if it is needed I can pull out the old one, install a new one and move on with things!
The hope of course is that any pee will be absorbed by the towel and flannel and the tablecloth will block it from getting to the carseat cover. Depending on the quantity of pee, it may not absorb everything, but I am hoping that the tablecloth can keep it contained (it goes up the sides a titch and up the back.) Good luck! Be sure to show me how yours turns out!
Here we go again! This is solidly the THIRD time we have attempted potty training for Mr. A and this time I am DETERMINED that it WILL stick! The last time we did it was in September, right around Mr. A's third birthday. We stuck it out for about a month before we quit. He could DO everything, hold it, successfully use the potty, etc., he just CHOSE NOT to. We decided we would give him the month of October and then try it again. Well, we got to the end of October and I don't remember exactly what happened, but I think we got a cold, and we just didn't get back to it between the cold and Thanksgiving then Christmas.
Well it is TIME! I'm soooo over spending $40 a month on diapers for the two of them (Yay for Sams Club that it's not more!) and changing way too many diapers!!!
The last time we tried our biggest problem was he just didn't want to! So this time was ALL about MOTIVATION!
We started with a fresh set of undies. They didn't have any undies that he liked so we got a plain white set and decorated them ourselves.
We put dinosaurs on one pair, Super Why on a couple others, and Bob the Builder on another.
Two jars, one had 5 chocolate coins, the other is empty. Every time he is dry and goes to the bathroom he can move a coin from the red jar to the treasure-chest jar. When all five are moved over he can pick something from the treasure chest!
If he isn't dry or doesn't go he can still pick a sticker for his sticker chart
We also have a tub of old Cherrios for targets (they float and flush without issue)
I also keep a tub of sanitizing wipes handy
A basket of 'spare-pairs'
And Diaper wipes (we found that he didn't like the dry toilet paper as much)
Our sticker charts. The top one was from the last go-around. The SuperWhy one is from this time. The green fishy is for Mr. C who likes to help ;)
We also keep a bucket next to the toilet for accidents
Until they finds their way in here (The washer)
So far Day one was totally accident free! Day 2... well... not quite as well. we went through 5 pairs of undies and 3 pairs of pants... (I'm still not sure exactly how that worked out) Hopefully it goes better going forward.
The good thing was he still remembered how to do it so we didn't have to start totally from scratch!
Some days you just need one of those easy, super fun, easy to clean projects when the littles are getting antsy!
One of my favorites involves homemade-kind of edible (not going to kill you, not too tasty though), fingerpaint! This recipe takes no time at all and is so simple the kids can help with most of it! I will often make this recipe before lunch or dinner, put it in the freezer to cool while we eat, then pull it out after for lots of messy (but easy to clean!) fun!!
3 Tbsp Sugar
1/2 tsp Salt
1/2 c. Corn Starch
2 c. Water
Combine ingredients in a small sauce pan and whisk until smooth, warm them up on the stove, stirring occasionally until mixture thickens. When it thickens, it will all at once. Seriously, it will be thin, then BOOM thick! Divide into containers and add food coloring as desired. Make sure you let it cool!
Now for my secret ingredient to non-messy fun....
The Bathtub!
No kidding! Our bathtub is white, so it is extra awesome, but I just strip everyone down to their diapers and stick them in the tub with paint. Then the boys can put paint all over the tub and themselves, and keep the mess maintained. When they're getting bored I fill up the tub with water and let them get the paint off of the tub and themselves. Then I just drain the water, refill it, and clean the kiddos for real!
(Did you notice the dirty hand in the corner there?)
I'm not kidding, you can get 2 hours of fun out of it!


