Monday, June 27, 2016

Wedding Flowers - Pink and Beautiful!

Wahoo!!!!  I feel like doing a little dance!  I've done four weddings (flowers) to date and this one was by the far the BIGGEST I've done yet!  There was the standard brides bouquet, bridesmaid bouquets, boutonnieres, and corsages, but there were also twenty centerpieces, a garland for the head table, and a couple random flowers here and there!  More than I've done before for sure!  So let me show you what I did!


Head table!  We ended up with oodles & oodles of greenery, especially lemon leaf, so we decided to make a garland out of lemon leaf for the head table (tutorial to come!)


A few roses and babies breath to tie it all together!


Full head table!


These centerpieces are gorgeous and so simple!  The bowl is a fishbowl spray painted gold with five hydrangeas bundled together and a couple of lemon lemon leaves! (Tutorial HERE!)


The hardest part, but probably the most beautiful were these centerpieces!


They are full of hydrangeas, roses, carnations, babies breath, lemon leaf, Israeli ruscus, and probably something I'm forgetting!


Each vases is 24inches tall.  I put clear rocks in the bottom of each and then filled them with water to balance out the centerpieces!


Each centerpiece is glued (hot glue) to the top to help it not be so tippy!  And guess what???!  Not a single vase tipped over all night!  Wahoo!!! That was my biggest fear!  I stressed and had nightmares about that for weeks!


and of course the bridal bouquet and bridesmaids bouquets.  The bridal bouquet was hydrangeas, peonies, roses, babies breath, lemon leaf and ruscus!  The bridesmaids were just hydrangeas and roses.

There were also boutonnieres and corsages out of spray roses and lemon leaf, but I can't find my pictures of these right now.

I will do some tutorials on most of these later, but right now I just want to enjoy how awesome they turned out!  

Congrats K & T!!!!

Wednesday, June 22, 2016

Summer of Weddings!

This summer is CRAZY busy!  My most current project is for a wedding coming up for my husband's cousin, and I'm doing her flowers!  Here's a quick sneak-peak of the flowers, with more to come when they're all done!  I'm so nervous and so excited!!!


Yup, that's a LOT of flowers!  There are 12 buckets and three totes!  Yikes!  Can't wait to see how it all comes together!

Monday, June 20, 2016

While you're gone - Home-time Clock

My husband is going to be gone for several weeks this summer to take a class for his PhD in physics (yup, he's my smarty-pants!).  He will be staying in a teeny-tiny room with blah cinderblock walls.  As such I wanted to send him a few surprises to brighten up his stay!

He will only get a suitcase, as he is flying, so anything I send must be small and light.

Since he will be in  a different time-zone I thought it would be cool to have a clock that can remind him what time it is for us so he can know the best times to Skype in and say good-night (or good morning, no 4am wake-up calls please)

So here's what I did,

I bought this $3 clock at walmart


Using a little tape as leverage/to get a grip on the clear cover, I pulled off the clear face cover.


Then I pulled gently pulled the hands off the clock and laid them out in order.  I did NOT want to forget the order they should go back on in!


Then I pulled the face off the plastic casing and was pleased to find it was just a plastic sheet.  I laid it over a picture of out family and traced it.  Don't forget the center dot!


I cut it out and punched the center hole.  Well, technically I ended up having to use an exacto knife to cut it, but you get the picture.

When selecting your picture and figuring out the placement, keep in mind that the hands will completely cover one point in the middle so print it super small (ideally probably around wallet size, I had to go with a 4x6 that I zoomed out as much as possible to make us as small as possible) and consider something a little off centered or at least without something in the middle.


Then I used the old clock face to write the four main numbers on the plastic casing.  I wrote them backwards on the inside with a fine tip permanent marker.  I did this so they would appear forwards from the outside and also so the numbers wouldn't rub off.  you could do all twelve or none at all, I just felt like the usability of the clock for us would be increased if it had some numbers. 

Then, put the new face (your picture) back in.  I used a titch of glue stick to help the picture stay put.  Then put the hands back in, following the order you took them out.  Finally put the clear cover back on and voila!  All done!


Now this clock can be used for our purpose of keeping our home time while away, or just as a personalized clock for just about anywhere!  At home, the office, school, on a trip, dorm room, you name it!  Show me your creations!

SaveSave

Saturday, June 18, 2016

Downeast Shirt Hack

I love this shirt form Downeast Basics!

You can find it HERE
eek!  or not, I guess that was the spring collection and it's gone...


Anyway, I loved it, but couldn't bring myself to buy it!  So being who I am, I decided to try my best to make my own!

I started with an old, boring, navy blue t-shirt


And a small, navy blue and white floral print from the fabric store


I traced (like, laid the fabric on top of the shirt and marked with a pencil) the front and back, added 2 inches up from the line I drew and cut two of each!


I also cut some strips for the side detail.

Then I cut off the original neckline and opened the shoulder seems (trimmed off the seam allowance)

Then just pin and sew!


Then match the second of each piece and sew and serge along the not-shirt-side.


Originally my corners were square, then I decided to round them instead, more like the original!


Mr. A snagged my phone and took some artistic pics while I was sewing!

Say 'Cheese!' Mom!


Serge and trim corners and such!


The next part I mega fudged, but it worked!  Just pin it like you want it to look and fiddle around with the layers until it looks right!


Stitch and serge everything off!


Next, I snipped the side-seam and did essentially the same thing.  Just sewed on one strip to each side.


Sew, serge, then attach another strip, right-sides together.


Then, same thing, just pin everything in place where you want it and stitch across the top of the strips and serge!


Then I hand-stitched everything down so it doesn't dry funny or stick out without my knowledge!

Lastly, add some buttons (and button holes if wanted/needed/if you can) (my button-holer was not happy when I did this!).  I simply pinned everything where I wanted it and then sewed the buttons on to hold everything down.  Ideally you would do button holes to give you enough neck to get in and out of the shirt (the flower-fabric doesn't stretch) but my hole was big enough and I couldn't get my machine to do button holes that day.


Show me your creations!  What's your favorite clothing hack or upcycle??


Wednesday, June 15, 2016

Easy Raspberry-Chocolate Snack!

How much better does it get???  Fresh raspberries, dark chocolate, and about 1 minute of time!


I honestly can't say where the idea came from, my head or somewhere else.  But when I went to sneak some chocolate chips earlier, and saw the raspberries leftover from lunch, it just made sense!  

Simple, one raspberry, one chocolate chip, delicious!

Enjoy!

Thursday, June 9, 2016

Handy Velcro Caddy

Mr. A wants a red bed, and I just see him wanting to change it in a couple months when his favorite color changes again!  So we compromised!  He is currently sleeping on my old bed, so it's a bit, well, girly.  So we are going to paint it a very neutral black, and we decided to make a red (and Jake) caddy to go on his headboard for snacks and books! So here's what we did,


First, I bought a 1/4 yard of red and a 1/4 yard Jake fabric.  This was enough for two bags, so a single 1/4 yard should be enough for one if you only want one fabric.

I cut :
1 each fabric for the main part
2 each fabric 2in x length of main square (top strip)
4 each fabric 3in x 5in (straps)
2 strips of velcro (both sides) about 2 in each


First, sew the straps, right sides together, on three sides and turn right side out.


Then sandwich the straps, insides together, between two long strips, right sides together, and stitch.  Also stitch the other set of long sides together


Attach long strips to top of large squares (right sides together)

Then put these pieces together (right sides together and stitch around three sides (two sides and bottom)


Line up the right side seam with the bottom and stitch across forming a triangle like so.  This will create a flat bottomed bag.


Turn right side out.


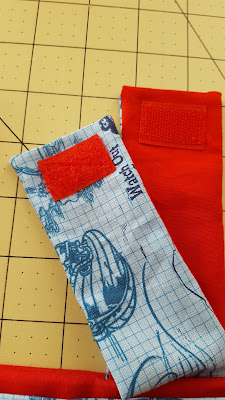
Attach velcro to ends of straps.  Be sure to pay attention to how it will velcro.  One piece goes on the outside, the other the inside.  I did the two sets of straps opposite of each other for strength.  


The should go together like so.


And you're done!  We strapped it on Mr. A's headboard and Mr. C's crib as a place to store drinks (water) books and the occasional snack. (I know you're not really hungry just want out of bed so I'll give you three crackers in a baggie-type snacks...)


There are so many potential uses for this bag!  If you made the straps short enough you could probably hang it from your handle bars or the cross beam of a bike.  This could be a handy caddy for a favorite chair, a walker or wheel chair, crib side (kiddo side or mommy side) for binkys or loveys.  The possibilities of this simple, basic bag are endless!  Enjoy!


Friday, June 3, 2016

Mom Messes - Desitin is the New Sunscreen...

Well, really, Desitin is probably not an advisable substitution for sunscreen, but that was my Mr. A's explanation for this MESS


The conversation went something like this,
Mr. A: Look Mom!
Me: Ahhh!             .
Mr. A: I put on my sunscreen!
Me: That's not sunscreen.... :'(


The white stuff everywhere... where all those arrows are and more... yeah, that's all desitin, a nice thick layer of desitin... Yuck!

Just in case you ever find your self in this situation let me tell you,

It does not just rinse off in the shower

Normal soap/shampoo (we still use Aveeno baby shampoo) does nothing

Dish soap does nothing!

I finally ended up using Goo Gone (found in the automotive/home improvement section, not the laundry section) first to loosen the gunk, then before rinsing sudsing up with that dish soap I tried earlier!  It got most of it off of Mr. A, but then there was the matter of around his eyes (which by the time we got to the shower and figured out how to get it off was rubbed all over his face in a fairly even coat).  

It was then that I discovered that the easiest way to get it off (and probably would've saved me quite the hassle) was to wipe it off with a wad of diaper wipes!  I got it all off from around his eyes no problem-o  

As for the tile, another diaper wipe

And the carpet.... well some of it is still there.  I covered it in baking soda and that helped quite a bit, but then they played in that and spread it all over so I didn't get it all out.  Yet.

(That being said, he has but desitin on the carpet before and I can tell you that the baking soda does work, it just takes time to pull all the oils out of the carpet!)

Oh, and his clothes still have it on them.  I need to get more Goo Gone, but haven't been anywhere they sell it yet and life has been crazy.  Tomorrow maybe?  So I can get them off my dryer?

That is all.  Just thought I'd share my findings from one of my more difficult messes!