Monday, December 28, 2015

Memory Quilt and Pillow - My Great Grandma

As you may know if you have read some of my early posts, my Great-Granmda passed away last March.  This last summer when we went to Colorado to visit with my family I was able to bring home her washstand to restore, that was in her bathroom as long as I can remember.


While we were there her children were working their way through some of her other things and there was a large pile of clothes on her couch, which gave me a fantastic idea.  Memory Pillows!  Such a great way to preserve the memory of someone you love.  Overtime you hold that pillow it is like a hug from your loved-one.  So I asked my Grandma if she would send me four of my Great-Grandma's shirts, particularly ones that were very 'Grandma-y' (you know, like shirts that you look at and say, yeah, that was grandma's!).  She sent me four shirts (which, I don't have a pic of the original anymore  due to my phone being unexpectedly wiped clean...)  I started with the four pillows, but had so much fabric left, I just couldn't toss it!  So I decided to make a quilt as well!


The pillows are 16in pillows from our favorite wally-world for just under $4 each.

Pretty much I just cut a 16in square from the front and back of the shirts, centering the buttons down the middle.  Then sew up all four sides.  The floral print I had to leave an opening and hand stitch the pillow in, but the other three I inserted the pillow through the front of the shirt and buttoned it in!  So simple! 


For my Grandma's Brother


For my Grandma's other Brother


For my Grandma's Sister


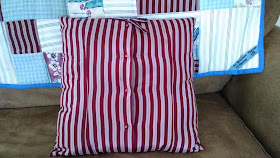
The original shirt had a tie at the top, so I reattached the tie to the top of the pillow


This one is for my Grandma.


I added a tag to my Grandma's to personalize it just a bit more.  Super simple, just 1/2in cream-colored quilt binding and a permanent fabric pen, voila! 

The quilt is made up of 

8in squares
2 1/2 x 8in rectangles
4 1/4 squares
2 1/2 x 4 1/4 in rectangles

Once everything was cut I assembled the smaller pieces into 8in squares, this made assembling the quilt easy!   I laid it out on the floor so that I could get as few of the same fabric touching each other as possible

I made sure to keep some of the details of the shirts in the squares:


Tie like the shirt had


Cuff Buttons


Collar buttons and Buttons from the front placket


Label on the quilt.  Again, 3/4in quilt binding and this time a permanent marker.

I stitched long-ways down the quilt to hold the layers together, then cut the backing 2in wider than the quilt then pinned and hand-stitched the binding.  Love you Grandma!

Have you ever made a memory quilt or memory pillows?  How have you repurposed something to remind you of someone you love?


Tuesday, December 1, 2015

Stocking Hangers!

Last year we put our Christmas tree in front of our fireplace because I was stubborn and thought it was the only place it could possibly go... Well, I have since adjusted to things, figured out our house a bit better, and have realized, that is simply not the best place for the tree!  For one thing, our stockings got draped over a chair because we had nowhere to hang them!  Once I decided the tree would go in a different corner I knew I had to find a way to hang out stockings!  Since we rent, screwing in hooks like my parents use seemed like a bad idea.  Stocking hangers that perch on the mantle seemed like the best idea, but being the cheap-o I am sometimes I couldn't bring myself to buy them!  I got to thinking though, and decided I could make them no problem-o!

First, Four pieces of 2x4.  Honestly I didn't even cut them, they were leftovers from another recent project!


Next I sanded down all the corners


Four sticks, about 2-3 inches long


I drilled holes in the end of each 2x4 and hot-glued the sticks in.
(The sticks were actually pretty snug by themselves, the hot glue was simply a precaution)


Then a coat of stain


Oops.  Guess I stained first, glued sticks in second...


Then I hot glued four big pinecones on the top of each piece of wood.  I used scrap sticks and globs of glue to level them out as needed.

Voila!


And the Stockings are now hung with care!


My Grandma made each of these stockings for me and my family.  Each is made from a pair of Jeans with a cute little pocket on the front.


I don't think that they would be able to support full stockings, but for the rest of the Christmas Season, they will display our unique stockings very well!


Merry Christmas!!!


Monday, November 30, 2015

25 Days of Christ - Countdown to Christmas!

My kids are still young, Mr. A is 3 and Mr. C is 18 months, but I still want them to not be stuck on the gifts and gimmies at Christmas!  It is really important to me that they learn why we celebrate Christmas and are reminded frequently throughout the holiday season.  

After some search I found an awesome 25 Days of Christ countdown that takes you through Christ's birth and life.  Perfect!  The only thing was, I am just too cheap to buy it!  (That and let's be honest, grad students really don't make all that much.)  So more research!

Next I came across Housewife Eclectic who had put together her own ornaments with the scriptures from the 25 Days of Christ countdown, and I loved what she had done!  You can check her version out HERE.  In fact, I would recommend downloading her printable with a list of the scriptures and an ornament idea for each of the 25 days!  I'm not even going to try to recreate it because I like what she did so much!

But here are the first 7 days of my version of the 25 Days of Christ - Countdown to Christmas!


My Tree: only about 18 inches tall, I think I bought it for $1 as a freshman in college!


Day 1: The Birth of Christ - Star

I used several small sticks about 4in long and hot glued them together where they intersect.  Once the glue had cooled I wrapped jute around the corners for extra strength and to hide the hot glue!  Then I put a spiral of wire on the bottom of the star to attach it to the tree.


Day 2: Announcement to the Shepherds - Shepherd's Crook

One pipe cleaner, 9 red beads, 9 green beads.  


Day 3: Three Wise Men - 3 Crowns

Housewife Eclectic did three crowns her first year, but on her printable, now uses three clothespin dolls.  I liked the crowns so I cut three crowns out of a toilet paper roll and painted them yellow!


Day 4: Boy Jesus in the Temple - Mini Scriptures

White paper on the inside, black construction paper outside, one staple in the middle.  Done!  I also wrote the reference for Day 4 on the inside.


Day 5: Baptism of Jesus - Dove

There is a dove pattern in the printable, but I liked this one better.  I just cut out the dove, used the blanket stitch to attach the wing and around the edge.  Black paint for the eye.


Day 6: Fishers of Men - Fishy!

I used the pattern in the printable for the fish and the blanket stitch again to finish it off!  White and black paint for the eye.


Day 7: Sermon on the Mount - Candle

All this candle is made of, is a clothes pin, red felt and yellow felt.  So handy, it just clips right on the branch!


Days 1-7!


MERRY CHRISTMAS!!!!

Saturday, November 28, 2015

Color Matching - Airplane Entertainment!

We recently flew North to visit my family and though the flight was only 1 1/2 hours, I was a bit nervous about having two very active toddlers on a plane!  Mr. A had his own seat, but Mr. C rode in my lap!  So I scoured around for some ideas and came up with a few new games that won't take much space in our 'personal items.'

I used:
The bottom 17in or so of an old pair of my husband's pants.  
Why 17 inches? Because that was just below the hole in the knee!
Rectangles of fabric, 1 1/2 x 3 inches for each color of the rainbow
four colored craft-sticks in each color of the rainbow
(Purchased at the dollar store, 100 for $1!)
(not pictured) one hair elastic


 From here I sewed each of the rectangles to the fabric, sides touching and hemmed the base fabric all the way around.  I then attached the hair elastic 1/3-ish of the way up on one side.


I have a stash of hair elastics specifically for sewing!  I found a really good idea on these simple black elastics and keep them in my sewing desk just for this purpose.


 Now all you do is fold down the top and roll it up and the sticks won't fall out in travel!


 All rolled and ready to go!


Then the kiddos can take the sticks out and sort them!  This is a great opportunity to talk about colors, especially with Mr. C (Mr. A pretty much knows his colors), to work on sorting and matching, besides just being fun!  And so simple!


This entire project cost me nearly nothing as I already had everything on hand!


Mr. C LOVED playing with this on the plane!  It was lots of fun!  Someone even asked to take a picture of it so she could reproduce it later!  Have fun!


Tuesday, November 24, 2015

Thanksgiving Thankful Turkey

Mr. A was quite enthralled with October and Halloween and after Halloween was over kept asking when we would dress up again.  Our decorations in the house didn't change very much (I mostly just do 'Fall' rather than Fall, Halloween, the Thanksgiving) so that really didn't help much.  So we started our,
Thanksgiving Thankful Turkey!


Basically I took a piece of butcher paper and cut a large circle, a much smaller circle, and a rectangle to make the base for our turkey.  Then I cut feathers out of construction paper.  Each night at dinner (or sometimes at other times throughout the day) we asked Mr. A and Mr. C what they are thankful for.  At first we had to help Mr. A think about something, but within a couple of days he was really getting the hang of it!  Mr. C kind of got it, but let me tell you, e-i-e-i-o is on this turkey 3 or 4 times! (Currently one of Mr. C's favorite books and song!)  

Try it yourself!  What do you and your family come up with?  How many feathers can you be thankful for??  This was a great way to teach the concept of being thankful as well as focus on the blessings we have before the Christmas season gets here!  Happy Thanksgiving everyone!

Tuesday, November 17, 2015

Lunch! Pasta-Reimagined

We eat a LOT of mac-n-cheese around here... too much really.  When Winco had their case-lot sale we bought 50 boxes of the stuff!  2 cases! Yeah, we eat that much.  Ok, really my boys eat that, I eat whatever miscellaneous leftovers I can find in the fridge.  My husband takes most of them from the night before, so it's generally quite the hodgepodge for me!

So today I decided to do something different!  Voila!  Pasta reimagined!


Ok, so nothing real fancy, but it sure beat what was in the fridge!

First, the spiral pasta, just cooked to the texture you prefer.  Then I sprinkled it with Italian-salad dressing seasoning and butter (the heat melted the butter).  Give the butter a minute to moisten the seasoning.  I used this recipe, however, if you make it just for the pasta, use about half the salt, it is intended to be diluted by oil and vinegar.  Another option would be to drizzle dressing over the noodles.  I chose not to because I wasn't sure the boys would like the acidy from the vinegar, but I think it sounds awesome. 

Then of course were the grapes

and biscuits left from Sunday dinner (butter and honey, yum!).

Enjoy!